Ooooh, what a clever title for a post. Ho, ho. Because I'm writing about building the hatch. Get it? Of course you do.
First, here's what I've been up to time-wise: filling in all of those blessed nail holes with Bondo. Nail holes, you say? Why, that doesn't sound tricky at all. Well, it is and it isn't. Each of the nails produces a localized depression where it compresses the glue, no matter how gentle I was when I put it in. Evening out the surface wasn't difficult, but it was a little time-consuming. Bondo is a delight to work with, but it still needs to be mixed and applied in small batches.
On the second roof sheet, I tried using drywall screws and buffering with little squares of MDF. I think that helped a little, but there was still a fair bit of filling and sanding to do. The first batch is largely done, and I'll go over it once more to get the leftover dings and any wows that I missed.
However, it's turning out well:
I had some time last weekend, and I decided not to spend it all doing body filling. I did some tracing, cutting, and sanding, and came up with two templates for the hatch ribs. There will be 6 in all: the outer ones will fit nicely into that back notch we've been looking at all along, and the internal 4 will hold it all steady at a consistent 1.5" thick.
It was a simple matter to cut them all out with the router, even though my second flush-trim bit is getting a little dull and tired, like its owner. I put together another spar, notched it out, and attached the ribs at the top end. Here's the whole assembly just kind of leaned on up there for a photo:
Neat! But definitely, well, floppy.
After drilling out the hinge, shimming with a bit of 1/8", I attached the top spar at the hinge point.
I've been worrying about sealing the hatch for some time now, and I want to make sure to do it right. To get a consistent gap and the proper shape (and hopefully to stop it from springing back when the plywood is glued on), I'm going to build as much of the hatch as possible while it's fastened precisely in place.
I measured the gap with a little piece of 1/8" and fastened the side to the main wall with blocks and drywall screws. This holds the thicker side ribs quite tightly, correctly gapped for the outer seals and flush with the outer wall. I built a base spar and fastened that onto the ribs using glue and blocking spacers:
Now the ribs are constrained (in 1 direction at least), and it's time to get to work on the short spacer . torsion spars. With Terri on the table-saw and me doing the installation, this was short work:
Now that looks like a hatch! A little "transparent" still, but better.
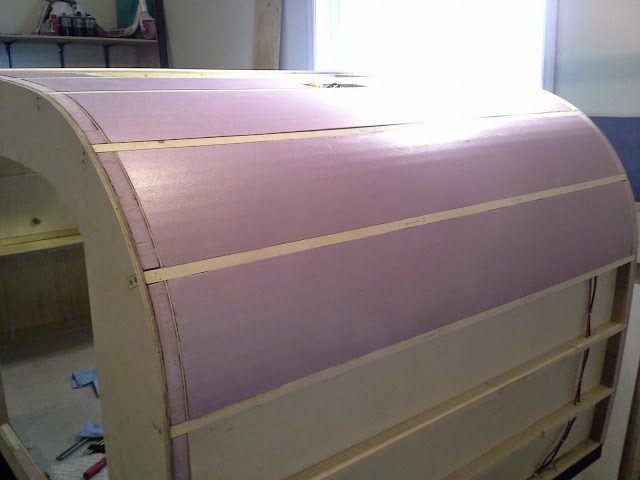
As I said, I'm going to do as much as possible without moving the assembly from the trailer. I'm part way through the foam installation, and I'll skin it, countersink some nails, and go over it with some Bondo once that's done. From then on, the shape should be quite firm. I'll take it off and do the interior skin and further touch-ups while it's loose.
Action item #1 is to take all those tools out of there before they get trapped inside. Note to self.
That scrap of grey conduit is for the lighting electrical. It needs a clear path to get shoved through on installation, since the wires can't stay locked in place like on the main trailer.
What a nice curvy little frame. Onto days and days of fitting in little squares of foam!


